2.4 防护方式 Linux
2.4.1 文件水印初始化
在加载各核心内嵌模块之前,需要对保护的网站目录进行初始化,初始化的过程就是扫描整个网站保护目录,对所有文件添加水印的过程。在初始化之前,请先确认当前网站没有被非法添加网页木马, 没有隐藏后门,否则一旦经过初始化阶段,这些有问题的文件也会被认定为合法文件了。
如果需要检查网站是否包含网页后门,请查阅【5.2 检查网页木马/Linux】章节
在做文件水印初始化之前,一定要先做好站点的路径映射和服务器关联,否则无法在控制台上做水印初始化。
水印初始化的具体步骤请见【3.4.4 水印签发 】章节。
在少量特殊情况下,也可以使用命令行方式批量签发水印。方法:
编辑”同步服务器安装目录“/wmktool.conf 配置文件,把其中的 dirs 段,改为需要做水印初始化的目录;如果有多个目录,需要用逗号分隔,每个目录的两边用双引号括起来;目录分隔符要使用正斜杠”/“:
xxxxxxxxxx{"ServerRoot":"/usr/local/iguard5/igdagent","filter":[""],"dirs":["/usr/local/apache2/htdocs","/usr/local/apache24/htdocs"]}cd 到同步服务器安装目录,执行以下命令,可以对wmktool.conf里指定的目录执行水印初始化:
./run-wmktool.sh -f wmktool.conf
如果需要查询某个特定文件的水印值是否正常,可以执行:
./run-wmktool.sh -f wmktool.conf -c verify ”需要校验的文件名“
如果返回码为0,则校验通过;如果返回码为110,则校验失败。
2.4.2 Linux/Unix Apache 核心内嵌
- 加载本模块前,请先确认已经为网站目录文件做过初始化,详见【3.4.4 水印签发 】章节。
- 如果需要对特定的文件/目录做特殊处理,如不需要进行防护,请提前做好设置,具体步骤参见【4.3.4对核心内嵌模块,放开对特定文件/目录的防护】章节。
在上述两步已完成的基础上,再进行以下配置。
1) 首先确认所使用Apache的正确版本。执行以下命令(此处举例假设Apache安装在/usr/local/apache2目录下,请根据实际使用情况修改):
# cd /usr/local/apache2/bin
# ./apachectl -V
得到以下输出内容:
xxxxxxxxxxServer version: Apache/2.2.31 (Unix)Server built: Jan 29 2016 12:24:38Server's Module Magic Number: 20051115:40Server loaded: APR 1.5.2, APR-Util 1.5.4Compiled using: APR 1.5.2, APR-Util 1.5.4Architecture: 64-bitServer MPM: Preforkthreaded: noforked: yes (variable process count)Server compiled with....
在【Server version】一项写着"2.2.31",在【Architecture】一项写着64-bit,说明应该选用64位的2.2版本模块。
编辑Apache的配置文件httpd.conf,根据Apache的不同版本,在文本的最后加入以下两行。这2行根据不同的 Apache版本(2.0、2.2或2.4)会有细微的差异。
Apache 2.0:
LoadModule ap2x_iguard5_module /usr/local/iguard5/igdagent/modules/ap2/mod_ap2_iguard5.so
LoadiGuardConfigFile /usr/local/iguard5/igdagent/modules/ap2/mod_iguard5.conf
Apache 2.2:
LoadModule ap2x_iguard5_module /usr/local/iguard5/igdagent/modules/ap22/mod_ap22_iguard5.so
LoadiGuardConfigFile /usr/local/iguard5/igdagent/modules/ap22/mod_iguard5.confApache 2.4:
LoadModule ap2x_iguard5_module /usr/local/iguard5/igdagent/modules/ap24/mod_ap24_iguard5.so
LoadiGuardConfigFile /usr/local/iguard5/igdagent/modules/ap24/mod_iguard5.conf
创建和修改alert报警文件的权限,执行以下命令:
# cd /usr/local/iguard5/igdagent/alert
# touch alert.log
# chmod 664 alert.*
最后重启Apache服务。
# cd /usr/local/apache2/bin
# ./apachectl restart
2.4.3 Linux/Unix Java中间件核心内嵌
- 加载本模块前,请先确认已经为网站目录文件做过初始化,详见【3.4.4 水印签发 】章节。
- 如果需要对特定的文件/目录做特殊处理,如不需要进行防护,请提前做好设置,具体步骤参见【4.3.4对核心内嵌模块,放开对特定文件/目录的防护】章节。
在上述两步已完成的基础上,再进行以下配置。
1)确认当前中间件使用的JDK版本。方法为执行以下命令(以下执行结果为举例,请以实际环境为准):
# ps -ef |grep java
如下执行结果为64位(中间显示“64-bit”信息),否则为32位。
xxxxxxxxxxjava version "1.7.0_09-icedtea"OpenJDK Runtime Environment (rhel-2.3.4.1.el6_3-x86_64)OpenJDK 64-Bit Server VM (build 23.2-b09, mixed mode)
根据实际情况, 把对应版本的JNI库文件放到Java的java.library.path路径下。
- JNI 库文件为安装目录里的 “modules/jee/libigx5_jni.so”;
要确定JNI库文件的位置,可以新建一个testpath.jsp文件,内部为以下代码:
xxxxxxxxxx<%out.println(System.getProperty("java.library.path"));%>
再通过浏览器访问http://主机IP:主机端口/目录/testpath.jsp,获得以下内容:
xxxxxxxxxx/usr/java/packages/lib/amd64:/usr/lib64:/lib64:/lib:/usr/lib ……
如上结果时,则可以把上述modules/jee/libigx5_jni.so 文件放到其中任一目录下,如/usr/lib64。
2)再把相应的中间件过滤器类文件(modules/jee/iguardfilter5.jar)添加到中间件服务器的CLASSPATH路径中。而对于不同的Java应用服务器,这步操作各不相同,具体可参见各产品的技术文档。以下是常见中间件产品中的做法。
- Tomcat 6、7、8系列:修改%Tomcat_HOME%/conf/catalina.properties配置文件里的
shared.loader=
改为
shared.loader="/usr/local/iguard5/igdagent/modules/jee/iguardfilter5.jar"
- WebLogic系列:编辑WebLogic启动目录下的setDomainEnv.sh文件,加入以下2行:
IGUARD_PATH="/usr/local/iguard5/igdagent/modules/jee/iguardfilter.jar"
export IGUARD_PATH
把原来的这一行:
CLASSPATH="${PRE_CLASSPATH} ..... "
修改为:
CLASSPATH="${PRE_CLASSPATH} ..... ${IGUARD_PATH}"
3)然后备份原Web应用配置文件web.xml为web.xml.bak,备份完成后,在web.xml文件内加入以下内容。这段内容在web.xml里的位置请参阅官方文档中【filter和filter-mapping】两部分在全局中的相对位置: http://docs.oracle.com/cd/E12839_01/web.1111/e13712/
web.xml
xxxxxxxxxx<filter><filter-name>iGuard Filter</filter-name><filter-class>cn.com.tcxa.iguard5.IguardFilter</filter-class><init-param><param-name>iguardConf</param-name><param-value>/usr/local/iguard5/igdagent/modules/jee/mod_iguard5.conf</param-value></init-param><init-param><param-name>debug</param-name><param-value>false</param-value></init-param></filter><filter-mapping><filter-name>iGuard Filter</filter-name><url-pattern>/*</url-pattern></filter-mapping>
最后,需要彻底重启中间件服务。重启过程中,观察启动日志,当看到类似以下信息,则为iGuard启动成功的标志。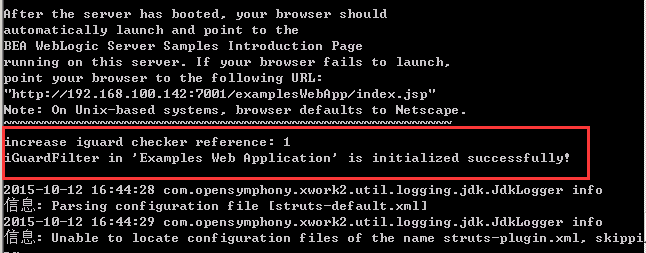
图示2-29 iGuard在Java中间件中启动成功的标志
2.4.4 Linux/Unix Nginx
由于Nginx的结构限制,不能动态加载模块,所以必须重新编译一次Nginx。在编译新的Nginx之前,一定要做好原Nginx程序和配置文件(nginx.conf)的备份。
1)首先获得原Nginx的编译参数:由于要重新编译Nginx,加入iGuard模块,编译时最好能和原Nginx模块和功能保持一致,否则原来的配置文件可能没法使用。
# cd /usr/local/nginx
# sbin/nginx -V
获得原来的编译参数可能如下(以下仅为举例):
xxxxxxxxxxconfigure arguments: --prefix=/usr/local/nginx --with-select_module --with-poll_module --with-http_flv_module --with-http_gzip_static_module --without-http_ssi_module --without-http_auth_basic_module --without-http_geo_module --without-http_map_module --without-http_referer_module --without-http_proxy_module --without-http_fastcgi_module --without-http_uwsgi_module --without-http_scgi_module --without-http_upstream_ip_hash_module --without-mail_pop3_module --without-mail_imap_module --without-mail_smtp_module --with-pcre=/tmp/pcre-8.40
2)备份Nginx安装目录/sbin/nginx执行文件和conf/nginx.conf配置文件:
# cd /usr/local/nginx
# cp sbin/nginx sbin/nginx.orig
# cp conf/nginx.conf conf/nginx.conf.orig
3)从以下网址下载Nginx加载器的源代码 nginx-iguardloader-V5.tgz :http://app.tcxa.com.cn/bbs/viewtopic.php?f=42&t=1337
4)把 nginx-iguardloader-V5.tgz 上传到Nginx服务器所在的机器,并执行解压,解压后目录为iguardloader:
# tar xzvf nginx-iguardloader-V5.tgz
5)重新下载同一个版本的Nginx连同上述Nginx iGuard加载器进行编译,方法是在复制原有的编译参数基础上,再加入一句”--add-module=/tmp/iguardloader“ (假设Nginx源代码解压在 /tmp/nginx-1.13.0目录下,iguardloader解压在 /tmp/iguardloader):
# cd /tmp/nginx-1.13.0
# ./configure --prefix=/usr/local/nginx --with-select_module --with-poll_module --with-http_flv_module --with-http_gzip_static_module --without-http_ssi_module --without-http_auth_basic_module --without-http_geo_module --without-http_map_module --without-http_referer_module --without-http_proxy_module --without-http_fastcgi_module --without-http_uwsgi_module --without-http_scgi_module --without-http_upstream_ip_hash_module --without-mail_pop3_module --without-mail_imap_module --without-mail_smtp_module --with-pcre=/tmp/pcre-8.40 --add-module=/tmp/iguardloader
#make
#make install
6)新的Nginx编译完成后,在原来的"nginx安装目录/sbin"目录下,会生成一个新的nginx可执行文件,原nginx已备份为nginx.bak
7)编辑"nginx安装目录/conf/nginx.conf"配置文件,在其中http{... ...}段内,加入以下配置(或参考igdagent/modules/nginx/nginx.conf 模板里的路径写法)
xxxxxxxxxxload_iguard /usr/local/iguard5/igdagent/modules/libigx5/libigx5.so /usr/local/iguard5/igdagent/modules/nginx/mod_iguard5.conf;enable_iguard on;
注意:在重新启动Nginx,使以上配置生效前,也需要先根据【3.4.4 水印签发 】章节的内容,对文件做一次初始化。
2.4.5 网络校验方式
从iGuardV5版本开始,本地模块和网络校验模块合并为同一个文件,只靠配置文件确定以哪种方式工作。
网络校验方式往往用在多台前端Web服务器共享同一个NAS存储分区的情况下。如果不是这个网络环境,通常不需要使用这种部署模式。
在网络校验模式下,多台Web服务器中,必须选择其中一台安装同步服务器igdagent服务,在同步服务igdagent安装过程中,必须选择【安装网络校验服务模块】,该服务的默认端口为18999。除了这一台Web服务器外,其他的Web服务器都无需安装这个【网络校验服务】。
在这台安装了【网络校验服务】的网站上,模块的安装为常规方式,配置文件完全无需更改。但除了这一台特殊的机器之外,其他的几套Web服务器,则需要选择以网络校验的方式安装,需要更改mod_iguard5.conf配置文件。
这些特殊服务器上的mod_iguard5.conf中的合适位置,新增以下内容:
xxxxxxxxxx{..."Mode":"net","CheckServer": {"Address":$address,"Port":$port},...}
其中$address为安装了【网络校验服务】那台机器的IP地址,而$port为【网络校验服务】端口,如18999。所以完整的mod_iguard5.conf可能如下:
x{"interrupt_action":"block","interrupt_status_code":403,"interrupt_content_type":"text/html","interrupt_info":"<html>403 Access Denied.</html>","filter":[],"ServerRoot":"/usr/local/iguard5/igdagent","cache":{"width":"","height":"","ttl":""},"rewrite_paths": [{"from": "/orig/path1","to": "/real/path1","case_sensitive":false},{"from": "/orig/path2","to": "/real/path2","case_sensitive":true}],"Mode":"net","CheckServer": {"Address":"192.168.100.9","Port":18999,"PassthroughOnBusy": true},"name":"Apache22-x86","type":"AP22","desc":"Apache22的32位防护模块"}
- 如果担心Web前端和网络校验中心的通讯影响访问,可以在
"CheckServer"段增加一个"PassthroughOnBusy": true,设置通讯出现问题的时候,不再做文件校验。该选项默认为关闭false。 - 如果文件在Web前端的路径和在网络校验中心的路径有差异,需要增加
"rewrite_paths"段做目录修正。"rewrite_paths"里的"from"路径,为在Web前端上的网页文件路径;"to"路径,为网络校验中心上的真实文件路径,也是同步规则中的目标端路径。
具体每种Web服务器的加载和配置方式,则与常规无异,参考上述章节即可。
注意:安装Linux版同步服务器时,虽然安装包里已经打包了网络校验中心的程序,但执行./install.sh安装脚本时,并没有把该程序安装到默认目录下。如果需要,可以在解压目录下手工复制 iwmsvc 可执行和 iwmsvc.conf.tmpl 配置文件。这部分的操作待完善。
2.4.6 Linux iLocker 拦截模式
iLocker为核心内嵌防护模式之外的独立防护模式,它通过对”用户账号“-”进程“-”进程参数“-"动作"-”文件模式“的细粒度灵活组合设置,控制文件的产生。达到既不影响网站的正常应用,又具备严密防护的效果。它可以和iGuard同步、iGuard核心内嵌完美地整合使用。
iLocker的独立手册请参见:http://www.tcxa.com.cn/ilocker/linux/help/ 。对此手册的精简提炼如下:
- iLocker 的配置文件为安装目录下的conf/ilocker.conf ,在其中每条规则或命令占一行配置;
- 每条规则的指令包括:
uid, exe_path, cmdline,operation,file_path, action, ignore_case,规则里的每项含义详见原手册:http://www.tcxa.com.cn/ilocker/linux/help/#header-n93 - 规则里经常用到的配置项为action,它包括三种文件处理动作:pass、deny和log。它设定对符合前面组合的条件的进程,会执行哪种事件处理:pass 会完全放行,不做处理;deny 会拦截,既该文件写操作被直接拒绝;log 会记录该文件操作但不拦截;
- iLocker 在作为网站服务器的防护方式时,默认使用的设备为 /dev/ilocker0;iLocker 作为发布服务器的文件变化监控时,默认使用的设备为 /dev/ilocker1 ;
- Linux iLocker 分1.0和2.0版本,两者配置文件格式不一样,无法兼容。以下描述仅适用于iLocker2.0。
以下为 iLocker2.0 搭配iGuardV5.5标准版使用,作为网页防护手段时,iLocker的安装步骤和配置建议:
1)获得iLocker 2.0 安装程序。根据实际文件名解压安装文件,再把解压目录下的文件,全部复制到iGuard同步目录下。具体步骤如下(实际文件名可能有差异):
# tar xzvf ilocker2.0_20180607.tar.gz # cd ilocker
# cp -rf * /usr/local/iguard5/igdagent
此时,在/usr/local/iguard5/igdagent目录下应该有bin、doc和lib等子目录,在bin目录下应有如下文件:
# ls -l /usr/local/iguard5/igdagent/bin
-rwxr-xr-x. 1 root root 8269 May 19 14:42 ilocker
-rwxr-xr-x. 1 root root 812 May 19 14:42 ilocker_conf_loader.py
-rwxr-xr-x. 1 root root 89 May 19 14:42 ilockerconsole
-rwxr-xr-x. 1 root root 5636 May 19 14:42 ilocker_log_reader.py
-rwxr-xr-x. 1 root root 1379 May 19 14:42 ilocker-test.sh
2)配置 /usr/local/iguard5/igdagent/conf/ilocker.conf文件,假设存放网页文件的目录在 /var/www/html,需要使用iGuard同步服务器做更新,此外的其他操作都被视为非法行为。该配置文件的内容建议为:
xxxxxxxxxx#ilocker.conf建议配置,以下设置对/var/www/html/目录放行同步服务器的进程,但拦截其他所有进程的写操作exe_path=/usr/local/iguard5/igdagent/igdagent,file_path=/var/www/html/*,action=passfile_path=/var/www/html/*,action=deny
从iLocker2.0开始,需要使用许可文件,才有文件实时拦截功能。除了上述文件目录配置外,还需要更新ilocker.conf里的许可证信息,修改以下相应指令:
xxxxxxxxxxlic_name=ilocker测试[试用]lic_code=TMGWC-7RYFT-D8XPJ-RGYXM-D9CTV
3)挑选合适的 iLocker 内核模块:cd 到lib子目录,根据系统的uname -an结果,选择合适的so模块,复制为ilocker.ko。如(可对比uname返回结果和cp命令里复制的文件名):
# uname -an Linux localhost.localdomain 2.6.32-279.el6.x86_64 #1 SMP Wed Jun 13 18:24:36 EDT 2012 x86_64 x86_64 x86_64 GNU/Linux
cd lib
ls
cp ilocker\@2.6.32-279.el6.x86_64\@x86_64\@rhel6.3\@.ko ilocker.ko
4)启动iLocker防护,执行以下命令(这句命令必须以root权限执行!):
# /usr/local/iguard5/igdagent/bin/ilocker -g start
查看iLocker状态:
# /usr/local/iguard5/igdagent/bin/ilocker status
重新加载iLocker
# /usr/local/iguard5/igdagent/bin/ilocker -g reload
停止iLocker防护
# /usr/local/iguard5/igdagent/bin/ilocker stop
5)把启动命令行加入自启动文件,如/etc/rc.local中,写入:
xxxxxxxxxx/usr/local/iguard5/igdagent/bin/ilocker -g start
6)按以上步骤设置和启动iLocker防护后,/var/www/html 目录将只能由iGuard同步服务器执行写入操作,其他写操作将一律被直接拒绝并记录。关于iLocker更详细的配置,请参阅 http://www.tcxa.com.cn/ilocker/linux/help/; 关于iLocker 用于发布端的文件变化监控,请参阅:【2.1.2.6 文件监控模式二:iLocker模式 】
2.4.7 Linux iLocker 自动恢复
iLocker还可以配合iGuardV5.5的报警机制,实现被改后主动发现和恢复的效果。步骤如下:
1)获得iLocker安装程序。根据实际文件名解压安装文件,再把解压目录下的文件,全部复制到iGuard同步目录下。具体步骤如下(实际文件名可能有差异):
# tar xzvf ilocker-20170518.tar.gz
# cd ilocker
# cp -rf * /usr/local/iguard5/igdagent
此时,在/usr/local/iguard5/igdagent目录下应该有bin、doc和lib等子目录,在bin目录下应有如下文件:
# ls -l /usr/local/iguard5/igdagent/bin
-rwxr-xr-x. 1 root root 8269 May 19 14:42 ilocker
-rwxr-xr-x. 1 root root 812 May 19 14:42 ilocker_conf_loader.py
-rwxr-xr-x. 1 root root 89 May 19 14:42 ilockerconsole
-rwxr-xr-x. 1 root root 5636 May 19 14:42 ilocker_log_reader.py
-rwxr-xr-x. 1 root root 1379 May 19 14:42 ilocker-test.sh
2)配置 /usr/local/iguard5/igdagent/conf/ilocker.conf文件,假设存放网页文件的目录在 /var/www/html,需要使用iGuard同步服务器做更新,此外的其他操作都被视为非法行为。该配置文件的内容建议为:
xxxxxxxxxx#ilocker.conf建议配置,请特别注意第二行的动作为log,而非上一节中的deny。这一行的动作里写log是仅记录不拦截模式exe_path=/usr/local/iguard5/igdagent/igdagent,file_path=/var/www/html/*,action=passfile_path=/var/www/html/*,action=log
3)挑选合适的 iLocker 内核模块:cd 到lib子目录,根据系统的uname -an结果,选择合适的so模块,复制为ilocker.ko。如(可对比uname返回结果和cp命令里复制的文件名):
# uname -an Linux localhost.localdomain 2.6.32-279.el6.x86_64 #1 SMP Wed Jun 13 18:24:36 EDT 2012 x86_64 x86_64 x86_64 GNU/Linux
cd lib
ls
cp ilocker\@2.6.32-279.el6.x86_64\@x86_64\@rhel6.3\@.ko ilocker.ko
4)启动iLocker防护,执行以下命令(这句命令必须以root权限执行!同时一定要包含-g参数。):
# /usr/local/iguard5/igdagent/bin/ilocker -g start
5)把启动命令行加入自启动文件,如/etc/rc.local中,写入:
xxxxxxxxxx/usr/local/iguard5/igdagent/bin/ilocker -g start
6)把/usr/local/iguard5/igdagent/igdagent/plugin/lua 目录下的 _alert.lua 文件,重命名为 alert.lua,并重启同步服务,具体步骤如下:
# cd /usr/local/iguard5/igdagent/plugin/lua
# mv _alert.lua alert.lua
# cd /usr/local/iguard5/igdagent/igdagent
# ./admtool stop
# ./admtool start
按以上步骤设置和启动iLocker防护后,/var/www/html 目录将只能由iGuard同步服务器执行写入操作,如果有其他进程进行写操作,iGuard会从源端重新恢复该文件。被改后的文件,也会备份到igdagent/backup目录下。